Saturday 19 July 2014

Sweet Potato Pancakes


Sweet Potato Pancakes

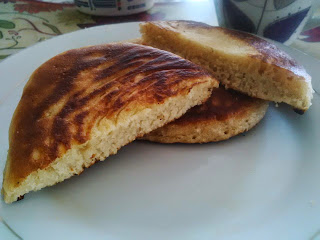
My sister wanted a nice breakfast this morning, instead of boring toast. For us that means pancakes! She decided to experiement a little with some sweet potato flour, locally made.

The recipe is a variation on one she took from a Reader's Digest magazine. She swapped out some of the wheat flour for sweet potato flour and we were very impressed with the results. The pancakes were light, fluffy and sweet.

This sweet potato flour is made from locally grown, white sweet potatoes. The flour may be naturally sweet. If you want the pancakes to be less sweet, halve the sugar.

INGREDIENTS

1 cup plain white flour (wheat)
1 cup sweet potato flour
4 tbsp brown sugar
4 tsp baking powder
3/4 tsp salt
2 cups milk
4 tbsp melted butter
2 eggs
1 tsp vanilla extract
1/4 tsp ground cinnamon


METHOD

1. Sift flour twice and combine with other dry ingredients.
2. Beat eggs with vanilla extract until fluffy.
3. Stir together milk, egg and melted butter.
4. Add the liquid mixture to the dry ingredients and mix until just combined. The sweet potato flour seems to be more absorbent compared to regular plain (wheat) flour. Add a bit more milk, if you find the batter is very thick.
5. Heat a non-stick pan to medium heat.
6. Cook pancakes- a quarter cup of batter makes a decent sized pancake. Pour a quarter cup of batter onto the hot pan and cook on one side until bubbles just begin to form on the top. Once bubbles start to form, flip over the pancake and cook the other side. Cook untill golden brown on both sides.

Serve warm with toppings of your choice.

Sweet potato pancake
Thick and Fluffy


Friday 28 February 2014

Rock Cakes

rock cakes
Rock Cakes

One of the first methods of cake making you learn in Home Ec classes here in the Caribbean is the Rubbed-In Method. Rock cakes and thimble cookies, if I recall correctly. Sometime late last year I suddenly felt nostalgic and decided to whip up a batch. 

For something I hadn't made in years, they came out nicely. Quick to make and you get a lot for a little.  Tasty and fittting easily into small hands, this is nice snack for children (just be sure to balance the sweet snacks with the fruit!). See recipe below.

Tips

Invest in a good a pastry cutter to rub the fat into the flour. This tool can be used for any rubbed-in recipe, including pastry. If you are using your fingers for this then take care to only use the fingertips. The fingertips are cooler than the palm and the rest of the hand. The butter is less likely to melt on you.

INGREDIENTS

200g self-raising flour
100g margarine (or butter), cut into small pieces
100g sugar
100g raisins/cherries/currants, coarsely chopped
2 small eggs, beaten
pinch of spice/cinnamon/all spice/chinese five spice

METHOD

1. Sift the flour and spice together (I always sift three (3) times. Always.)
2. Rub the margarine (or butter) into the flour, using a pastry cutter or the tips of your fingers. The mixture should look a lot like breadcrumbs. No large chunks of margarine (butter) remaining.
3. Add the sugar and the dried fruit. 
4. Mix in enough of the egg to give you get a firm mixture. If it is too stiff after you add all of the egg, add a few drops of milk till you get the right consistency. The mix should maintain its shape stiffly, when dropped from a spoon.
5. Drop spoonfuls of the mixture, approximately two (2) tbsp in size, onto a prepared cookie sheet (well greased or lined with silicone or baking paper). Don't smooth the tops, the cakes should resemble rough little rocks. Keep cakes about 2 inches apart. But the mix should be stiff enough that the cakes don't spread much on baking.
6. Bake at 350F (180C), half-way down the oven for 10-15 minutes.
7. Remove the rock cakes when done and cool on a wire rack.

These store well in an air-tight container, in the refridgerator.

Friday 14 February 2014

Mauby Part 1

What is Mauby?

A drink made from an extract of mauby bark. On its own the extract is very bitter with a unique flavour. (NB: It does not taste like root beer.)

Mauby (drink)
In Barbados, we make mauby by diluting a small amount of the extract with water and adding sugar to taste. Some, strong of constitution, will even have it unsweetened! Several local companies make a ready-made mauby syrup, to which you just add water.

In this two-part series of posts I will give you some background on mauby and how it is used in Barbados and the Caribbean. The first post will be about the origins of mauby, the recipe for making the extract and drink  and some of the local tradition. Part 2 will probably be about how other countries in the Caribbean make the drink and any other interesting tibbits I can find.


 Mauby Bark

leaves and fruit of mauby tree
Leaves and fruit of the Mauby Tree (Colubrina elliptica)
Source: http://eol.org/pages/582433/overview


Mauby comes from a type of Buckthorn tree called Soldierwood or Mabi. Latin name: colubrina elliptica. It is typically found across the Caribbean and Latin America. It is ironic that mauby is so much a part of Bajan culture- as far as I can find, the tree doesn't grow here.

The drink is actually made from an extract of the dried bark of the tree. It comes in large shavings, that look a bit like cinnamon bark, but it is a much darker brown. We take a handful of bark shavings and boil it in water with spices to create the extract. I'm calling it an extract because that is technically what it is. But in Barbados we just call the extract mauby or mauby bitters.

The Mauby Seller is a part of the Barbados tradition that isn't seen anymore. These were roving sellers, often women, who sold mauby to anyone who wanted a drink. My father remembers a price of 4 cents for a tot. A tot being a drinking utensil made from an empty tin can. This was the middle of the last century.

The Mauby Seller would travel from place to place on foot, with the large can of mauby balanced on her head. They dispensed the drink by reaching up, turning on the spigot on the can on their head and allowing the liquid to flow into a tot held below- never removing the can from their heads. And never spilling a drop. The distance that the liquid had to travel meant that the mauby got a good "head" on it i.e. frothy top, rather like what happens with beer. My grandmother used to make mauby and then pour it back and forth between two glasses- just to recreate the "head" effect.

Tradition also holds that some sellers had a skull in their cans! The superstition was that this would help drive sales. However, I don't think this ever stopped people from buying the mauby.

Mauby Bitters (Mauby Extract)

INGREDIENTS
Mauby bark and cinnamon
Mauby Bark (dark brown shavings) and Cinnamon (light brown)
  • 5 cups of cold water approx.
  • 2 oz mauby bark approx.
  • a large stick of cinnamon
  • 1/4 cup of sugar (optional)

METHOD

1. Place all the ingredients in a large saucepan and bring to a boil.
2. Allow to boil for one (1) hour.
3. Remove from the heat and allow to cool.
4. Strain the extract into a clean bottle or jar and store in the refrigerator.

Mauby Drink

INGREDIENTS

4 cups cold water
2-4 tbsp mauby bitters per each cup of water
Sugar to taste

METHOD

1. Add some of the mauby bitters, and sugar to the cold water and stir to mix thoroughly. Start with a small amount.
2. Taste. Add more bitters and/or sugar to suit your preference. The bitter and sweet should be well balanced.
3. Place in fridge or freezer to chill. Best served ICE-COLD.


Sunday 20 October 2013

Cheesy Pesto Rice


cheesy pesto rice
Cheesy Pesto Rice
Rice and peas, with chicken- baked or fried- is the Sunday food tradition in Barbados. Suggesting trying something different for Sunday lunch will generally draw a blank stare from your average Bajan. They may countenance adding salads and other side dishes, but rice is the standard.

I have never been a fan of rice, though I have eaten it almost every Sunday for my entire life. However, rice and corn are the most readily available alternatives to wheat. Wheat and I have a long and happy association but lately it has become apparent that I feel better if I don't  eat it. Choosing to significantly cut back on the amount of wheat products consumed, means turning to rice a lot more than before.

This is a quick recipe I made up when I got very bored of eating rice.

INGREDIENTS
  • 2 cups cooked rice (may be brown or white, with or without peas or vegetables)
  • 2 tbsp cream cheese (flavoured is good e.g. chive & onion)
  • 1 tbsp basil pesto (OR 4-5 medium sized fresh basil leaves, very finely chopped)
  • 1.5 - 2 oz cheese (e.g. cheddar, mozarella, edam etc.; use one type or mix two or more kinds)
  • 1 tbsp parmesan cheese, finely grated (OR 1/2 oz shredded)
  • 1/4 tsp powered garlic or garlic & herb seasoning
  • 1 tbsp spicy brown mustard
  • 1/2 tsp onion powder
  • 1 tsp dried chives
  • A few dashes of pepper sauce, optional and to taste
  • A pinch of black pepper

DIRECTIONS

1.  Pre-heat oven to 350F.
2.  Mix all the ingredients together very well, in a bowl. Rice should form a soft but firm mass.
3.  Spray a small oven proof dish evenly with cooking spray.
4.  Put all the rice into the dish.
5.  Cook in pre-heated oven for 15 -20 minutes, till heated through and the top is golden brown.


Thursday 3 October 2013

Internet Recipe- Microwave Cake-In-A-Mug


Cake
Yellow Mug Cake Topped with Jam
I love cake.

It is probably my favourite food. I think it should have its own food group. I have a permanent cake craving. Mug Cakes are a fast way to deal with a craving for dessert.

I (or rather my sister) first came across the microwave mug cake concept in a Readers' Digest. And I confess I was...very skeptical. Microwaves do not have a sterling reputation for cake making. Cakes, with few exceptions, are supposed to be light with a  fine texture. Microwaves rubberize food. Microwave and cakes did not seem an auspicious pairing.

But the cake turned out very nice, with some fine tuning. Taking the time to make a few adjustments depending on the power of your microwave etc. can lead to an even better cake. Or you can just toss it together quickly and zap the craving faster. Either works.

That Reader's Digest recipe was a chocolate cake. The recipe below is a plain yellow cake which is more versatile that the chocolate versions (credit to Buzzfeed, URL included). The parts highlighted in green are my notes/variations on the original recipe.

What I Did...
  • Added lime juice because its very egg-y.  You can also try beating the eggs with a bit of lime/lemon rind, before adding to the mixture, if you really can't stand a strong egg taste.
  • Flavoured it with 1/2 teaspoon of orange extract, 1/4 teaspoon of rum extract and 1/8 teaspoon of cinnamon. 
  • Topped it with some strawberry jam on finishing, while it was still hot. To get jam to a pouring consistency, microwave it 10 second intervals, stirring in between.
  • Sifted the flour three times. I always do. Never mind the "pre-sifted" thing written on the bag. Sift your flour. Three times. Light flour is critical for light cakes.
I think the liquid ingredients should be added to the dry ingredients and not the other way around (which will create a lot of lumps). This approach should make the cake a bit lighter.

I have found it better to cook a microwave mug cake for the least amount of time needed to get it just firm. Then give it some standing time to set properly. Standing time is a staple of microwave cooking that most people have forgotten about. In our microwave I cooked it for two minutes and then let stand, longer cooking times made it rubbery.

I have also tried drizzling some sweetened coffee and  amaretto syrup unto the finished cake. That was delicious.

Possibilities. Try it for yourself and post your variations.


*   *   *   *   *   *   *   *   *   *

MICROWAVE MUG CAKE- YELLOW

http://www.buzzfeed.com/emofly/tips-recipes-microwave-mug-cakes?s=mobile

Yellow cake is the classic birthday cake, and a perfect blank canvas on which to paint a sweet celebratory picture. Eat it as is, or fold in anything you like — chocolate chips, candies, nuts, fruits — to create a personalized mug cake statement.

Makes 2 mug cakes

INGREDIENTS

2 tablespoons unsalted butter
1 large egg
2 tablespoons milk
1 teaspoon pure vanilla extract
1 tsp grated lime/lemon rind OR 1/4 -1/2 tsp lime juice
1/4 cup granulated sugar
6 tablespoons (1/4 cup plus 2 tablespoons) self-rising flour [if you don't have self raising flour use 6 tbsp plain flour plus 3/4 tsp baking powder]
Pinch of kosher salt

Topping Ideas: Chocolate frosting, vanilla frosting, whipped cream, rainbow sprinkles, chocolate jimmies, or colored sugar crystals.

PREPARATION

1. Place the butter in a large mug and microwave it for 20 to 30 seconds until melted. Add the egg and whisk it in with a fork.
2. Stir in the milk, vanilla, and sugar.
3. Add the flour and salt. Beat the batter until smooth.
4. Divide the batter between two mugs.
5. Microwave separately for 1.5 to 2.5 minutes each until risen and firm.

Wednesday 18 September 2013

Blueberry Cheese Cake


Photo of Blueberry Cheese Cake from Gayle Cooks
Blueberry Cheese Cake


First things first, let's get something straight.....

There is absolutely NOTHING wrong with using condensed milk to make a cheesecake. It is quite economical. In many Caribbean countries, it has traditionally been a pantry standard, and is therefore usually to hand. Additionally, I have found it to be very flexible in cheese cake recipes- you can easily adjust the amount of condensed milk to adjust the sweetness.

This is a nice, simple recipe, great for the inexperienced baker. I have tried a number of cheesecake recipes and always come back to this one...with its condensed milk.

Food Network and Cooking Channel are making culinary snobs of us all...


INGREDIENTS

Crust

One 8- or 9-inch ready-made graham cracker pie shell

OR
8 oz  digestive biscuit crumbs (or graham cracker crumbs, if you are from the USA)
2 oz  sugar
2 oz  margarine or butter

Filling

2 - 2 1/2 packages cream cheese (each package = 8 oz.)
1  can condensed milk (12 - 14 oz)
2 eggs
2 tsp lime or lemon juice
1 tsp vanilla essence or vanilla extract

Blueberry Topping

1 can blueberry topping

OR

2 cups frozen blueberries
1/2 cup water
1/4 - 1/2 cup granulated sugar (optional)
1 tbsp corn starch
1 tsp lemon juice
sprinkling of cinnamon


METHOD

Topping
If you are making the topping from scratch...
1.  Combine the blueberries, sugar, water, cinnamon, and lemon juice in a saucepan over medium heat. 
2.  Dissolve the corn starch in a tablespoon of cold water, whisking until smooth. 
3.  Pour the corn starch into the fruit mixture in the saucepan and cook until thickened. 
4.  Remove from the heat and cool.


Crust
If you are making the crust from scratch...


1.  Combine digestive biscuit crumbs and sugar.
2.  Melt the margarine (or butter).
3.  Add melted margarine (or butter) to the dry mixure of crumbs and sugar. Mix well, until the fat is evenly distributed.
4.  Press the mixture onto the bottom of a 9-inch spring form pan. You can also press some of the crumbs onto the sides. Be sure to distribute the crumbs evenly. There should be very little variation in the thickness of the crust.
5.  Place the crust in the fridge or freezer to chill. Use the freezer if you will be ready to fill the crust in about 15 - 20 minutes. Otherwise, place in the fridge.

Filling

1.  Pre-heat your oven to 350 F.2.  While the crust is chilling, cut cream cheese into small pieces and place in a blender.
3.  Add the eggs, milk, lime juice and vanilla.
4.  Blend all the ingredients until completely combined. The batter will be a thick liquid.
5.  Pour the batter into the prepared crust. Do not overfill*.
6.  Bake at 350 F for 30 - 40 minutes, until almost set.
7.  Remove from the oven and cool.
8.  Remove from the cake from the pan and arrange it on a serving plate. Pour on the blueberry topping and serve.


* If you have left-over batter, you can bake it in another dish, well-greased. Voila! Crust-less cheese cake!


Monday 16 September 2013

My Baking Powder Dillema


I actually did the Cream Cheese Pound Cake twice.

This first time around I wasn't satisfied with the outcome. The cake was light with a good texture and tasted lovely.

But when it was sliced there was a faint "line" towards the bottom of the cake. It looked like a shiny streak of compacted cake.... I'm sorry I didnt take a pic. It's proving to be very hard to describe.

This is not the first time we have had this problem. Sometimes, when this happens it may due to egg whites that that not been mixed in properly. However in reviewing the process I didn't think this was the case. The eggs are beaten first before being added to the cake and I mix quite well between additions. Also the cream mixture didn't show any signs of curdling suggesting that the egg wasn't incorporated. And anyway I have found that curdling is quickly corrected at the folding in stage.

I have long suspected that this was an issue related to the baking powder. If the b.p. isn't working well, then the cake may not be rising properly and compacting at the bottom, giving that denser area at the base.

So I decided that the second time around I would try to eliminate all likely  b.p. issues. I bought a brand new tin of b.p. I bought a different more expensive brand. I also decided to make sure that I had the precise proportions of flour to b.p. 

Now the correct proportion is 1 tsp b.p. to every 4 oz of flour. But as I looked at the recipe again I realised that the flour is in cups (volume) and ounces (weight)! The recipe suggests 2 tsp b.p. to 2 cups flour, which is typically used for 8 ozs of flour. But my mother always said that she used 3 cups of flour as  equivalent to 1 lb. 2 cups would be 2/3 lb, more than 1/2 lb.

I measured the flour, according to the recipe, and then weighed it. And guess what? The 2 cups of flour weighed more than 8 ozs. Actually closer to 10 ozs. A light bulb went off in my head. So I calculated the corect amount of b.p. for the weght of the 2 cups of flour and used that instead of the 2 tsps- about 2.5 teaspoons.

And would you, believe it- problem solved! Perfect cake!